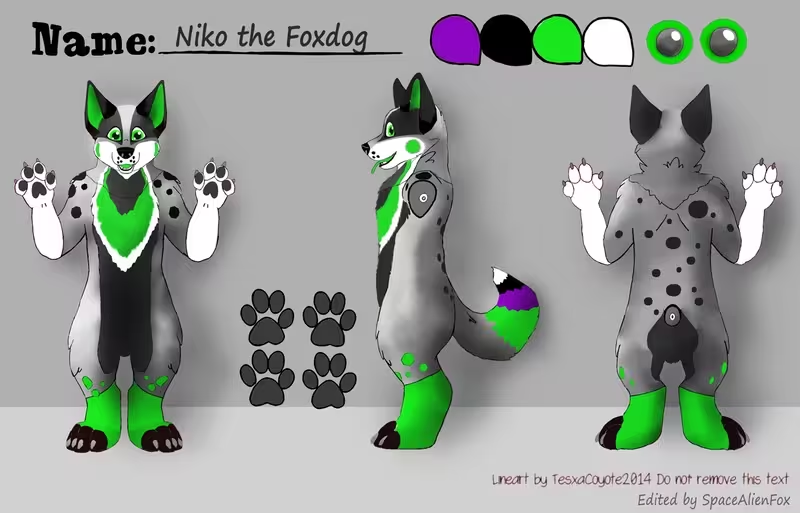
Niko the Foxdog
 View photo session →
The head
We applied our head shape for doggie projects. The sweeps are shown below: the yellow dotted line of the pattern is the line of symmetry of the head, and the green line shows the place where the ear will be glued. The workpiece is glued from foam polyethylene, with a steel frame at the edges, so it has a light weight and perfectly preserves and restores the shape. The jaw is made openable and can be removed.
Pasting the head with fur
Before gluing the fur on the head blank, we check and correct the color of the character's head in a graphics editor (the fur is drawn over the photo). If everything looks well, we start getting the patterns for fur. For this, the mask is pasted with adhesive tape in several layers and everything is drawn according to the chosen color of the character. The tape is cut into pieces and flattened on a plane — this gives the recesses that provide volume after sewing. Further we sew the fur pieces and this becomes a "skin". The edges of the fur near the eyes and mouth are bent and sutured so that the "torn" tissue base of the artificial fur is not visible. Unfortunately, in this project the process of pasting with fur was not photographed in detail.
The nose
The nose is raised relative to the base of the mask using the same material as the head, but thinner. The nose is soft and covered with fleece. The method of obtaining the patterns for fleece is shown in the photo.
Pasting fleece inside the head
Stages of work: 1. Adhesive strips of fleece on the edges of the jaw, mask and eyes. 2. Further we get a pattern of the inner part of the head, pasting it with adhesive tape. 3. We transfer the obtained pattern from the tape to fleece; cut and sew; further we paste a large area inside the mask immediately. 4. Set the eye boxes, afterwards we scan for fleece patterns by pasting the area with adhesive tape. 5. The base of the eyes is pasted with fleece. The photo below shows the pads: two of them behind the ears of the fursuiter to create space for the jaw of the mask, and one on the forehead. All pads are removable and can be shifted to some extent to adjust the best fit of the mask on the head.
The eyes
The eyes at the head blank are supported by steel wire, which is responsible for strength. To make the eyes look the same, we make their frame from a pattern out of thick plastic. The frame of the eyes consists of one solid wire, which also passes over the cheek of the mask and is fixed by a bend on the occipital part of the skeleton. Thus, this skeleton in addition to the eyes also supports the shape of the cheeks, and allows you to adjust the "width" of the head and the bend of the transition from the corners of the eyes to the cheeks. The size of the eye in the skeleton form is chosen larger. This accounts for pasting by a thick "double" fleece: this will reduce the size of the eyes by about 4 millimeters, and even out small irregularities. The eyes are made with the tracking effect. Their boxes are assembled from 3 mm white plastic. Between the eye boxes there is a "hollow" for the nose of the fursuiter. The iris and pupil of the eyes are drawn with waterproof acrylic on banner grid. Inside the head, the eye boxes are covered with fleece.
Apron for the head
To make an apron correctly you need good patterns. This is done by pasting adhesive tape over the required place, namely the part of the mask which is placed on a person with broad shoulders (preferably). In our design, the apron consists of two parts: the front and the back. In this project the front apron has strips of fur of different colors. To keep different colors of fur in the desired position relative to the overalls, the front and back aprons are fixed to each other with buttons. An apron consisting of two parts allows you not to use a zipper on the back of the head, which makes it easier to dress the mask. To keep the neck profile, the rear apron contains a small zone with textile elastic bands. The back apron covers the neck and fastens on a robust large button under the front apron. The jaw can be completely removed together with the front apron, allowing good access to the inside of the finished mask, for example for quick drying. As a result, you should get a pattern like in the photo. Later it will be divided into patterns for the front and back apron.
Teeth & tongue
Teeth are made of white fleece by the pattern shown in the photo. The effect of individual teeth is obtained by wrapping a strong nylon filament over a "fleece tube" blank filled with synthetic padding. The jaw returns to the closed position by textile elastic bands, which are fastened inside the mask on Velcro. The Velcro area is increased, which allows you to attach elastic bands with different tension for comfortable jaw movement. The photo below shows a removable tongue. There may be several tongues in the kit. The tongue is attached via Velcro, which allows you to change it: several tongues of different lengths allow you to quickly change the character image.
Ventilation
A large 3.2" fan is installed in the mouth. This fan allows you to maintain good performance while remaining quiet. The 12-volt fan runs at half the possible speed from popular USB power banks of 5 volts. Although nothing prevents using a voltage-boosting adapter — then the mask will be cooler than without one. If necessary (washing) the fan is easy to remove. Its position inside the mouth can also be easily changed and tuned. The side gaskets around the fan prevent warm air from flowing back into the mask and keep the fan inside the mouth well. When the fan is installed, the jaw remains slightly ajar to pass warm air without constant jaw tension from the fursuiter. The mask design provides for a large ventilation gap: the air flows freely from the holes at the base of the mask's ears to the mouth, flowing along the sides of the fursuiter's head. The fan as a "spacer" for the jaws on the sides is well held by friction, so it is left without a rigid attachment and can be adjusted to any convenient position.
Paws
The basis for feetpaws is a frame made of foam rubber, so they are suitable for a wide range of sizes (US 7 to 12). For more comfort, inside the feetpaws is a fleece sock which can be turned outward for drying or washing. This project has one pair of feetpaws — with a rubber sole for the street. The rubber outsole is glued and stitched along the edge with strong threads. Handpaws are made with soft padded pads and soft claws of gray fleece. They are sewn on a sewing machine by a covering seam.
Overalls
The overall of the fursuit was made with a low waist, i.e. it can be worn in two versions (see photo). Such sewing also opens up the possibility of not needing to account for the height of the fursuiter (unless they are particularly small). The overalls are sewn with a large reserve in width, and then compensated by sewing textile elastic bands. Thus, this fursuit is well suited for people of absolutely different sizes. To make the overall look neater and more defined, it was shaved.
Padded overalls
The shape of the fursuit is given by the pads. We make detachable pads from a very stretchable fabric with synthetic padding filling. This makes it easy to remove pads and clean them separately from the overalls (or vice versa). In addition, they have very low weight relative to foam liners, and are well compressed during transport.
The jumper for overall
In order for the overalls to sit "like a glove" in a wide range of fursuiter sizes, it is desirable to sew them with textile elastic bands. Here are a few photos of how it is done.
The tail
The tail is made detachable with a removable skin to facilitate drying after washing (in most cases it is enough to wash only the fur part of the tail). Its attachment to the belt is provided by loops from a durable nylon cord, which are sewn to the strong tail frame. In the overalls a small sleeve is provided for the tail — this conceals and ensures the smoothness of the transition from the body to the tail.