|
|||||||||
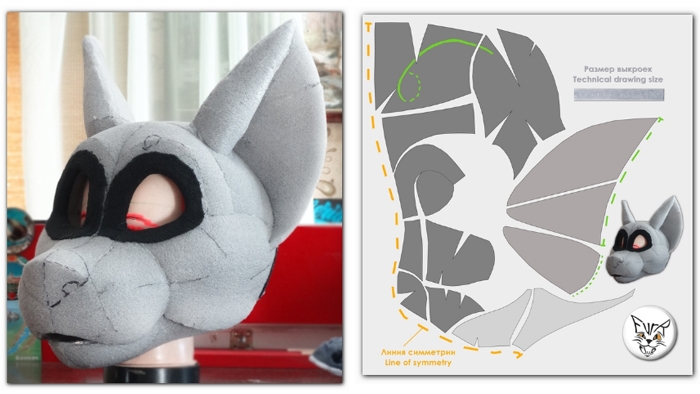
The head for Tiger |
|||||||||
|
The head's shape was
developed specifically for this project. Below is presented the method
of obtaining patterns and the end result.
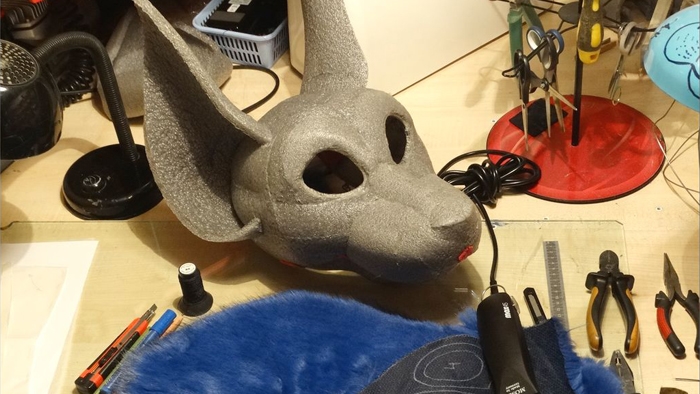
The mask was glued from thin polyethylene foam and a metal frame along the edges. The mask has a lighter weight in comparison with construction made of plastic or foam rubber. The resulte perfectly save shape, which can be little corrected on an already fully assembled mask. Jaw made not only openable, but completely removable - this is facilitates head drying. |
|||||||||
 |
|||||||||
|
|||||||||
 |
|||||||||
|
|||||||||
|
When start mounting
a metal frame into "crust" of mask, places that are subject to the
greatest load appear, and there may be breaking of polyethylene foam.
It places may be pre-strengthened by gluing pieces of fleece - also it
will be convenient for sew the wire of the frame to these places, this
greatly simplifies gluing wire along the edge.
|
|||||||||
 |
|||||||||
|
On the diagram shows the pattern for this head. Pattern was already adjusted for respect to the better end result (above in the photos - this is work with uncorrected patterns). The yellow dotted line is the line of head's symmetry: accordingly, the half-mask is shown on diagram. The red dotted line relates to parts of the ear, and places for ear's gluing. |
|||||||||
|
|||||||||
| Up... | |||||||||
The stage of pasting the head by fur. |
|||||||||
|
Before start to make fur's patterns of head, it is advisable to check the colors scheme of the character - drawing it on top the photo of mask. |
|||||||||
 |
|||||||||
|
For make the fur's
patterns, need glue over the mask by scotch tape (by several layers)
and draw the desired the color's scheme. After transferring this
patterns to fur, it must be sewn as "fur's skin". To get a neat edge of
fur at the edges of the eyes and mouth- needs to make by invisible "the
torn fabric" of the artificial fur - in these places the fur is bent
and embroidered by thread.
|
|||||||||
 |
|||||||||
 |
|||||||||
|
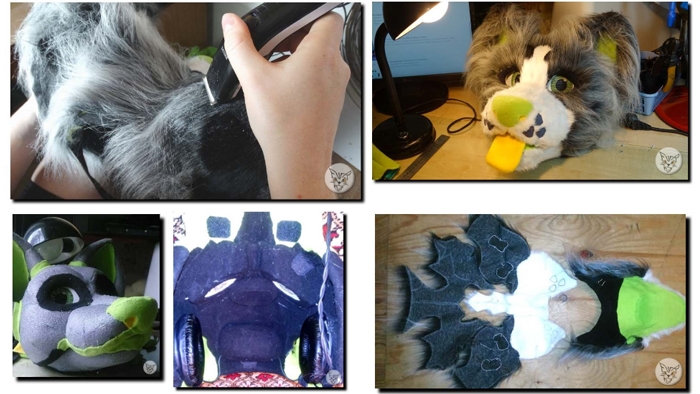
To make the mask
look more neat, needs shave a fur on the muzzle to a short length. An
example of before and after is shown in the photo:
|
|||||||||
|
|||||||||
| Up... | |||||||||
Nozzle |
|||||||||
|
To the nose is not
lost in the fur, it must be raised above the mask
material. For this, it is pasted with an additional layer of material.
The nose turn out to be soft. And being covered with fleece, nose it
will be is safe if you accidentally bump by nose to the surrounding
ones (which may happens quite often).
|
|||||||||
|
|||||||||
|
|||||||||
|
The strip of black
fleece around the nose is initially sewn to the fur of the mask - by
that its accuracy is achieved. The edging has a varied width along the
edge of the nose for a more aesthetic appearance (first option, a
simple straight edging, and was spoiled the appearance).
|
|||||||||
|
|||||||||
| Up... | |||||||||
Ears |
|||||||||
|
The design of inner part the ears includes a fleece coating. Pattern for this part is obtained by gluing the ear by an adhesive tape. The transition from the ears to the head is also pasted with stripes of fleece - this is necessary both for the strength of these places, and for the further convenience of gluing the fur's parts of the patterns from the ear to head. |
|||||||||
|
|||||||||
|
To
carefully attach fur to a ear of mask, you can follow the following
method: |
|||||||||
|
|||||||||
 |
|||||||||
|
Ears hide in the
mask large openings for additional ventilation. The ventilation holes
will be masked by fur, so they can be large size.
|
|||||||||
 |
|||||||||
| Up... | |||||||||
Pasting fleece inside the head; |
|||||||||
|
The inside of mask must be looked also aesthetically pleasing, as well as the outside, and for that we cover it by fleece inside. This is done as follows: 1.
Strips of fleece about 5 cm wide cover all the edges of the mask,
including the eyes and jaw. |
|||||||||
|
|||||||||
| Up... | |||||||||
The eyes |
|||||||||
|
The eyes are made
with tracking effect, i.e. they are recessed into the interior of the
mask.
The symmetry of eyelids, position and shape of the eyelids are set and
preserved by a wire frame that continues on the cheeks and adjusts the
width of the upper half of the mask (while forming the convex cheeks
below).
The frame for eyes is made from 3 mm white plastic. The form of the eyes's boxes have a cavity for the nose of animator. The iris and pupil - made by painted waterproof acrylic over the banner grid. Inside the head, the carcass of the eye is covered with a black fleece (see about it above). |
|||||||||
|
|||||||||
 |
|||||||||
|
|||||||||
| Up... | |||||||||
Making the aprons |
|||||||||
|
Just like when the
head's cover by fur, the manufacture of aprons begins with obtaining
their patterns. To do this, you need cover by scotch-tape the places of
future aprons (this is shown in the photo). In our design, two aprons:
front and rear, this allows you to do without a zipper on the back of
the head, which makes it easier to dress and use a mask. The shape of
the neck is formed by elastic bands on the back apron. The back apron
covers the neck and fastens on a reliable, large button under the front
apron. The front apron is completely removed together with the jaw.
This allows free access to the inside of the fully assembled mask (for
example, for quick drying, cleaning or servicing of the removable fan).
|
|||||||||
|
|||||||||
|
The rear apron has a
buckle at the front, which hides under the front apron. This design of
the apron simplifies dress the mask, and delete such an inconvenient
element as a zipper in the visible place (on the back of the head).
|
|||||||||
 |
|||||||||
|
|
|||||||||
| Up... | |||||||||
The Teeth |
|||||||||
|
Teeth are made of
white fleece according to the pattern as in the photo. Individual teeth
are obtained by covering the "fleece tube" with a strong nylon thread.
The jaw is moves at the expense of textile elastics, which are fastened inside the mask on Velcro. The place for Velcro was increased, this is allows them to be fasten with different tension. It allows adjust the comfortable and not heavy movement of the jaw. The jaw is completely removable. Below, on the second photo, you can see the removable languages (there are several of them in the kit + soft lining under the chin). The lining is held on a textile velcro and can be shifted in a wide range to adjust the ease of opening the jaw. For example, using this pad, can be set a constantly open mouth to ensure good ventilation. |
|||||||||
|
|||||||||
 |
|||||||||
| Up... | |||||||||
Ventilation of the head |
|||||||||
|
For this mask, two fans were made: 40 and 80 mm. But, the small fan
turned out to be very inefficient even on full turns (at 12 volts).
Still, the bigger the fan, the better. So, we recommend that do the
largest fan for the maskes, which is guaranteed will close the entire
section of the mouth of the mask. For example, a large fan allows you
to maintain good performance and silence when powered by a USB
pour-bank (the fan will run at half of the possible revolutions).
|
|||||||||
|
|||||||||
|
|||||||||
| Up... | |||||||||
Paws |
|||||||||
|
Gloves (fur paws)
are made with convex pads.
|
|||||||||
 |
|||||||||
|
The basis for the
furfeet - is a carcass made of foam rubber. Thanks to this foam's shell
our furfeets are lightweight and suitable for legs of almost any size.
Since foam rubber is uncomfortable in its pure form and is not very
resistant to tearing, foam was closed and strengthened by a fleece sock
that can be turned out for drying or quick washing. Made two pairs of
feetpaws: with cushions on the sole - for photo shoots and for street,
with rubber sole.
|
|||||||||
 |
|||||||||
 |
|||||||||
|
|||||||||
 |
|||||||||
| Up... | |||||||||
The overall |
|||||||||
|
The overalls are
made universal in size and with a low waist, or it will allow the
animator to have very high growth. The versatility of the dimensions is
ensured by a large size in the width of overall over the entire height.
This is width turns to tight-fitting shape thanks textile gum, which
sewn on overalls.
|
|||||||||
|
|||||||||
|
The character of
tiger has a some of symmetrical strips. To draw them on overalls, can
follow the following method:
1. Needs to clothe the the future tiger's overall dress on his copy (simply the mannequin from the fabric). 2. Draw a strips on same one half of overall, just for their approximate position. 3. Next, by along the contours of the future strips needs cover by adhesive tape, and allows this will move the boundaries of the strips relative to each other to find their best mutual position. 4. Needs to describe by good visible line the selected contour of strips on the current half of overall. 5. Seal the inner space of tiger's strips by scotch tape. 6. Unstick the future patterns of tiger's stripes and cut it along the contour, i.e. along the adhesive tape. 7. Must transfer-out the patterns of the each strip by symmetrically to the second half of the tiger's overall. |
|||||||||
|
|||||||||
|
|||||||||
| Up... | |||||||||
Exoskeleton's linings. |
|||||||||
|
The form of the
character's body is set by the exoskeleton's linings (this is besides
the torso of the animator himself :)). The linings are removable:
inside the overalls have textile velcro. That is, linings can be
removed and cleaned separately from the overall. Exoskeleton's linings
are sewn from a highly stretchable fabric and it filling by sintepon.
In comparison with the usual version from foam rubber pads our linings
are very lightweight. Also, unlike foam rubber, these pads are
perfectly compressed for transportation.
|
|||||||||
 |
|||||||||
|
|||||||||
| Up... | |||||||||
Stretchble the fursuit body |
|||||||||
|
The photo shows a
pulling of overall through textile elastics: several zones along the
overalls can be stretched by twice. This is done to fursuit was sitting
"like a glove" in a wide range of possible sizes of animators. Also, it
reduces the risk of tearing overall, when do such simple actions as
deep squatting.
|
|||||||||
|
|||||||||
| Up... | |||||||||
Tail |
|||||||||
|
The tail is made
demountable: it consists of a frame and a removable skin's cover. It's
comfortable, since in most cases it is enough to wash only the fur part
of the tail. This design speeds up the drying process after washing,
because the filler from sintepon would dry much longer if you will be
clean the tail entirely.
Fastening of the tail to the belt is provided by loops of a strong nylon cable, which are sewn to the frame of the tail. This is a very sturdy construction, as the tail frame is sewn from a more stretchable and durable fabric than an artificial fur. In the overalls, a small sleeve for tail is provided to provide masking and integrity of a line's transition of the tail to the body. |
|||||||||
 |
|||||||||
 |
|||||||||
| Up... | |||||||||
 |
|||||||||


Link to the photo session of fursuit